Yosemite National Park, renowned for its world-class rock climbing, drew us in with its promise of granite adventures. Yet, amidst the challenging ascents and vertical escapades, the park's awe-inspiring landscapes beckoned us to explore a different form of expression — photography.
During our well-deserved rest days from conquering the granite cliffs, a close-knit group of friends and I embarked on a quest to discover the most picturesque corners of Yosemite Valley. Among our coveted destinations, one stood out like a beacon — Glacier Point. Why? For the chance to witness the ethereal beauty of a Glacier Point sunrise.
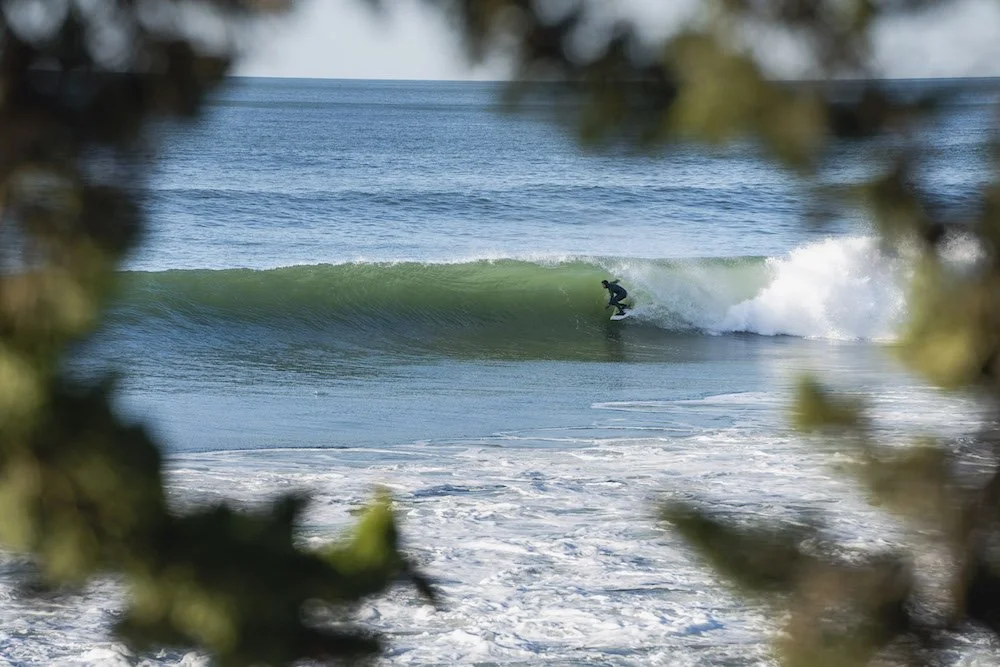
As passionate photography enthusiasts, we had delved into the works of modern greats who had immortalized Yosemite's breathtaking vistas. However, we aimed to add our own unique twist to this iconic location. Surveying our array of gear and props, we hatched an ambitious plan: to capture a skateboarding photograph careening down the serpentine road leading to Glacier Point. Join us on this journey as we blend the adrenaline of skateboarding with the tranquil majesty of Glacier Point's sunrise, creating a photographic masterpiece of our own.
Glacier Point is an iconic location to photograph while visiting Yosemite National Park. Photograph by Dalton Johnson
Pros
Stunning Vistas: Glacier Point offers breathtaking panoramic views of Yosemite Valley, Half Dome, and the High Sierra peaks, providing ample opportunities for landscape photography.
Iconic Landmarks: You can capture iconic landmarks like Half Dome and Yosemite Falls from a unique perspective, creating memorable images.
Golden Hours: The location is perfect for sunrise and sunset photography, with soft, warm lighting that enhances the beauty of the landscape.
Seasonal Variety: The park's diverse seasons offer different photography opportunities, from lush greenery in spring to vibrant fall foliage and snow-covered landscapes in winter.
Wildlife: Yosemite is home to diverse wildlife. You might spot animals like mule deer, squirrels, and birds, providing chances for wildlife photography.
Accessibility: Glacier Point is easily accessible by car, making it convenient for photographers of all skill levels.
Star Photography: The dark skies at Glacier Point are great for astrophotography, allowing you to capture the Milky Way and stars.
Cons
Crowds: Glacier Point is a popular tourist destination, which means it can get crowded during peak seasons. This may limit your ability to set up your equipment or find a quiet spot for photography.
Limited Parking: The parking lot at Glacier Point can fill up quickly, and finding parking during peak hours can be challenging.
Changing Weather: Weather conditions at Glacier Point can be unpredictable, and fog, rain, or high winds can affect your photography plans.
Distance: Depending on where you're staying in the park, Glacier Point may require a significant drive, which could limit your time for photography, especially during sunrise or sunset.
Limited Facilities: There are limited facilities at Glacier Point, including restrooms and food options. Be prepared with essentials for your photography session.
Permit Requirements: If you plan to shoot commercially or use drones, you may need permits, so be sure to check and comply with park regulations.
Photographing Glacier Point Basics
Photographing at Glacier Point in Yosemite National Park is an exhilarating experience, offering a plethora of composition options for landscape photographers. To simplify your approach and ensure you make the most of your photography expedition, consider these essential considerations:
Composition Exploration: Glacier Point provides numerous vantage points to explore. Take the time to wander around the area to discover the composition that resonates most with your vision. Try different angles, heights, and perspectives to craft a unique shot.
Timing and Weather: Timing and weather are paramount for capturing breathtaking landscape shots. Clouds can add drama and texture to your images, but be mindful of the sunset being obscured by thick cloud cover. Conversely, a completely cloudless sky can result in a less captivating shot. Pay attention to weather forecasts and aim to shoot during the golden hours—shortly after sunrise and before sunset.
Arrival Time: Arriving at Glacier Point well in advance is crucial. It allows you ample time to explore the area, set up your equipment, and scout for your preferred composition while patiently awaiting the perfect lighting conditions during sunset.
Sun Position: Understanding the sun's position throughout the year is key. In the summer months, the sun sets to the left, casting its warm light on the landscape. In late fall, it sets behind you, creating different lighting dynamics. Choose your shooting time according to your desired lighting effect.
Consider Additional Elements: Besides Half Dome, consider whether you want to include Vernal and Nevada Falls, situated to the right of Half Dome, in your shot. Including these elements can add depth and scale to your composition, providing a sense of the vastness of the Yosemite landscape.
In essence, photographing at Glacier Point is an art that combines patience, timing, and a keen eye for composition. Embrace the ever-changing weather, lighting conditions, and seasonal nuances to create your own stunning images of this iconic location. Whether you're a seasoned photographer or a novice, Glacier Point's beauty is sure to inspire your creativity.
Best Time of Day to Photograph at Glacier Point:
Choosing the best time of day to photograph at Glacier Point depends on your photography goals and the style of shots you want to capture:
Sunrise:
Best for Lifestyle and Instagram Photography: The soft, warm light of sunrise bathes the landscape in a golden glow, creating a magical atmosphere. This lighting is excellent for lifestyle and portrait photography, as it imparts a flattering warmth to your subjects.
Fewer Crowds: Sunrise tends to be less crowded, allowing you to capture the tranquil beauty of Glacier Point without many distractions.
Unique Perspective: The morning light can cast unique shadows and highlights, adding depth and character to your images.
Sunset:
Best for Landscape Photography: Sunset is a prime time for capturing stunning landscape photographs at Glacier Point. The warm, low-angle light enhances the natural beauty of the surroundings, illuminating Half Dome and the valley in breathtaking fashion.
Dramatic Skies: As the day transitions into evening, you're more likely to encounter dramatic cloud formations that can add intrigue and mood to your landscape shots.
Longer Golden Hour: Sunset often provides a longer golden hour compared to sunrise, giving you more time to experiment with different compositions.
While sunrise and sunset offer distinct advantages, don't limit yourself to just these times. Glacier Point's beauty can be appreciated throughout the day, and each moment presents unique opportunities for photography. Consider exploring the location during the day to capture the changing light and explore creative angles. Ultimately, the "best" time to photograph depends on your vision and the story you want to tell through your images.
Photography Equipment for a lifestyle or Elopement shoot at Glacier point:
For a lifestyle or elopement shoot at Glacier Point, your selected photography equipment is well-rounded and suitable for capturing a variety of shots. Here's a gear list that complements your existing setup:
The Zoom Lens Trio: For any lifestyle shoot, I like to bring the trio of zoom lenses by Tamron that give me a range from 17mm to 180mm all at f/2.8.
Tamron 17-28: The Tamron 17-28mm is a versatile wide-angle zoom lens, perfect for capturing expansive landscapes and dramatic vistas at locations like Glacier Point in Yosemite.
Tamron 28-75: The Tamron 28-75mm is a popular standard zoom lens, offering a practical range for various shooting scenarios, from portraits to candid moments during a lifestyle or elopement shoot.
Tarmon 70-180: The Tamron 70-180mm is a compact telephoto zoom lens that allows you to get closer to your subjects, making it suitable for capturing intimate details and candid emotions during lifestyle or elopement photography sessions.
Camera: You can’t go wrong with a mirrorless camera from any of the top brands today, my go-to camera body is the Sony a7rV
External Flash or Speedlight: Even though natural light can be incredible at Glacier Point, having an external flash can be beneficial for filling in shadows during portraits, especially in challenging lighting conditions.
Tripod: Since you'll be doing lifestyle and elopement photography, having a tripod is still essential. It will help you stabilize your camera for group shots or long-exposure images if needed.
Reflector or Diffuser: These tools can help you manipulate and control natural light, which is important for achieving the desired look in your lifestyle shots.
Extra Batteries and Memory Cards: Ensure you have spare batteries and memory cards to avoid running out of power or storage space during your shoot.
Lens Cleaning Kit: Dust and weather conditions can affect your gear. A lens cleaning kit with a microfiber cloth, lens cleaning solution, and a blower will help keep your lenses and camera clean.
Rain Cover: Weather at Glacier Point can be unpredictable. Having a rain cover for your camera can protect it from sudden rain showers.
Reflective Umbrella or Softbox: If you plan to shoot during harsh midday sunlight, using a reflective umbrella or softbox with your external flash can help diffuse and soften the light for flattering portraits.
Remote Shutter Release: This is handy for capturing self-portraits or group shots without needing someone to press the shutter button.
Props and Accessories: Depending on the concept and style of your shoot, consider bringing props or accessories like blankets, flowers, or decorative items that can enhance the visual story of your elopement or lifestyle shoot.
Model Releases: If you plan to use the images for commercial purposes, have model release forms ready for any individuals featured in your photographs.
Permits: Be aware of any permit requirements for commercial photography in the park, especially if your shoot involves clients or models.
With these additional items, you'll have a well-equipped kit to capture beautiful lifestyle and elopement images at Glacier Point. Don't forget to plan ahead and communicate with your subjects to make the most of this stunning location.


Photography Equipment for a Landscape shoot at Glacier point:
For a landscape shoot at Glacier Point, the photography equipment you've listed is a good start, but here are a few additional items that can enhance your photography experience and help you capture stunning images:
Camera: You can’t go wrong with a mirrorless camera from any of the top brands today, my go-to camera body is the Sony a7rV
Wide-angle Lens: The Tamron 17-28 is a great choice, but you might also consider a wider lens for capturing the expansive vistas at Glacier Point.
Filters:
Polarizing Filter: A polarizer can reduce reflections and enhance the colors of the sky and water. It's particularly useful for controlling glare on the granite surfaces.
Neutral Density (ND) Filters: ND filters allow you to use longer shutter speeds, which can be beneficial for smoothing out water or capturing cloud movement during daylight hours.
Remote Shutter Release: A remote shutter release or intervalometer can help you take long-exposure shots without introducing camera shake.
Extra Batteries and Memory Cards: Glacier Point may be cold, and cold weather can drain your camera's battery more quickly. Ensure you have spare batteries and enough memory cards for your shoot.
Lens Cleaning Kit: Dust and mist can be prevalent in outdoor locations. Having a lens cleaning kit can help you keep your lens and camera sensor clean.
Backpack or Camera Bag: A sturdy and comfortable backpack or camera bag can make it easier to carry your equipment and protect it from the elements.
Appropriate Clothing: Be prepared for variable weather conditions. Bring warm clothing, especially if you're shooting at sunrise or sunset when temperatures can be chilly.
Headlamp or Flashlight: If you're shooting during early morning or late evening hours, having a headlamp or flashlight can be helpful for navigating the area and setting up your equipment in low light conditions.
Lens Hood: A lens hood can help reduce lens flare and protect your lens from any stray light.
Laptop and Card Reader: If you plan to review and edit your photos on-site, a laptop and a card reader can be handy.
Photo Apps: Consider having photo apps on your smartphone for planning shots, checking the weather, and determining the position of the sun or moon.
Lastly, bug spray, it's a good idea, especially during the warmer months when mosquitoes and other insects can be prevalent in wooded areas around sunset. Always be prepared with essentials like water, snacks, and first-aid supplies when shooting in the great outdoors.
How to Get to Glacier Point
To get to Glacier Point in Yosemite National Park, you have several options, depending on your preferences and the time of year. Here are the primary ways to reach Glacier Point:
1. By Car (Summer and Fall):
During the summer and fall months when Glacier Point Road is open (typically late May to early November, but check the current road conditions), you can drive to Glacier Point.
Enter Yosemite National Park through any of the entrances and make your way to Yosemite Valley.
From Yosemite Valley, take the Wawona Road (Highway 41) to the Glacier Point Road, which is located near Badger Pass Ski Area.
Follow Glacier Point Road to its end at Glacier Point.
2. By Hiking (Summer and Fall):
If you're an avid hiker and want a more immersive experience, you can hike to Glacier Point.
There are several trails that lead to Glacier Point, including the Four-Mile Trail (strenuous), Panorama Trail (moderate to strenuous), and the Pohono Trail (moderate to strenuous). Each offers unique perspectives and challenges.
Ensure you have the appropriate gear, maps, and information, as these hikes vary in length and difficulty.
3. By Tour Bus (Summer Only):
Yosemite Valley Shuttle Tours offer guided bus tours to Glacier Point during the summer season.
These tours provide informative commentary and a convenient way to reach the viewpoint without driving or hiking.
Check with the Yosemite National Park Service or authorized tour operators for availability and schedules.
4. By Cross-Country Skiing or Snowshoeing (Winter):
In the winter, when the road is closed to vehicles, you can access Glacier Point by cross-country skiing or snowshoeing.
Glacier Point Road is groomed for skiing, and rental equipment is available at Badger Pass Ski Area.
Be prepared for winter conditions, and check with the park for trail and road status.
Important Tips:
Always check the current road and trail conditions before heading to Glacier Point, as accessibility can change due to weather and maintenance.
Consider arriving early in the day to secure parking, as it can fill up quickly during peak times.
Bring plenty of water, snacks, and clothing layers, as the weather can vary, even during the summer.
Respect park regulations and Leave No Trace principles to protect the environment.
Keep in mind that Glacier Point offers stunning views, so be prepared to capture the beauty of Yosemite National Park with your camera when you arrive.
Other Yosemite Photography Spots to Consider:
Yosemite National Park is a photographer's paradise, offering a multitude of stunning photography spots. In addition to Glacier Point, here are some other must-visit photography locations in Yosemite:
1. Yosemite Falls:
Yosemite Falls is North America's tallest waterfall, offering captivating photo opportunities.
Photograph it from various viewpoints, including the Swinging Bridge and Cook's Meadow, for different perspectives.
2. El Capitan (El Cap):
El Capitan is a massive granite monolith and a favorite subject for landscape photographers.
Capture its imposing presence from viewpoints like El Capitan Meadow and the famous Tunnel View.
3. Tuolumne Meadows:
Located in the high country of Yosemite, Tuolumne Meadows is known for its expansive meadows, alpine lakes, and granite peaks.
The meadows provide excellent opportunities for capturing wildflower displays and stunning reflections in the Tuolumne River.
4. Cathedral Peak:
Cathedral Peak is a striking granite formation in the Tuolumne Meadows area.
Hike or find vantage points to photograph this iconic peak against a backdrop of alpine scenery.
5. Tunnel View:
Tunnel View is one of the most iconic viewpoints in Yosemite National Park.
It offers a breathtaking vista of El Capitan, Bridalveil Fall, and Half Dome in the distance, making it a must-visit spot for photographers.
6. Fire Falls (Horsetail Falls):
Fire Falls, also known as Horsetail Falls, is famous for its natural "firefall" phenomenon that occurs in late February when the setting sun illuminates the waterfall, creating a fiery effect.
Photographers flock to El Capitan Picnic Area to capture this rare and stunning event.
7. Mariposa Grove of Giant Sequoias:
This grove is home to some of the largest trees in the world, including the famous Grizzly Giant.
Photograph the giant sequoias to capture their immense size and ancient beauty.
8. Mirror Lake:
Mirror Lake offers reflections of the surrounding cliffs and Half Dome in calm waters.
Visit during the spring and early summer when the lake is at its fullest for the best mirror-like reflections.
9. Sunrise and Sunset at Various Locations:
Sunrise and sunset throughout Yosemite National Park offer magical lighting for photography.
Explore different spots like Valley View, Olmsted Point, and Sentinel Dome for sunrise and sunset shots.
Remember to check for seasonal conditions, park regulations, and road access when planning your photography trips to these locations. Yosemite's diverse landscapes provide endless opportunities for photographers to capture the beauty of nature in its various forms.

Sunset glow on Half Dome photographed from Glacier Point in Yosemite National Park. Photograph by Dalton Johnson
Whether your photographic journey at Glacier Point in Yosemite National Park leads you to capture the grandeur of its landscapes or the intimate moments of a lifestyle or elopement shoot, this iconic location offers a canvas of endless possibilities. With the right equipment, creativity, and an understanding of the unique challenges and beauty this destination presents, your photography at Glacier Point is sure to yield breathtaking and memorable images.
From the majesty of Half Dome to the warmth of a sunrise, Glacier Point beckons photographers to explore its diverse and awe-inspiring vistas, reminding us that amidst nature's grandeur, there's always a story to tell and a moment to capture. So, grab your camera and embark on a photographic adventure that will leave you with images to cherish and stories to share for years to come.